So far, we have been looking at subjects located in a subject plane, with the lens focused such that the image appears perfectly sharp. In the real world, however, the three-dimensional subjects are hardly ever located in a single plane, but extending somewhat before and behind it. What happens in these cases?
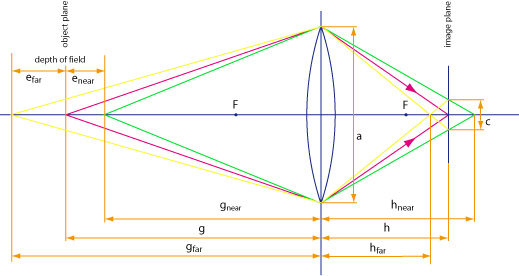
The situation is shown in the image above. The purple rays are indicating a subject which is perfectly in focus, i.e. for a given focal length f, the subject distance g and the image distance h are adjusted according to the lens equation
| 1 / f | = | 1 / g + 1 / h | (D1) |
In this case, the image of a point (in the subject plane) is again a point (in the image plane).
Now, imagine a subject a little closer to the camera, while the settings of the lens remain unchanged. This situation is illustrated by the green rays. According to the lens equation
| 1 / f | = | 1 / gnear + 1 / hnear | (D2a) |
the rays are now converging somewhere behind the original image plane. On the image plane where our image sensor is located, the rays are thus illuminating a small spot. It will have the same shape as the aperture of the lens, i.e. in most cases, it will be (more or less) circular.
Next, imagine a subject a little farther away from the camera, again with the same settings of the lens. This situation is illustrated by the yellow rays. According to the lens equation
| 1 / f | = | 1 / gfar + 1 / hfar | (D2b) |
the rays are now converging somewhere before the image plane, again resulting in a small spot on the image sensor. (Note: gfar is not drawn to scale, but somewhat shortened to fit on the page.)
In both cases, the image of a point is no longer a point, but a small circular spot. In other words, the image gets blurred, it appears slightly unsharp.
9.1 Circle of confusion
Instead of moving a subject back and forth and seeing how the size of the blur spot is affected, we can look at it the other way, define a maximum size of the spot that we are willing to accept as sharp, and see how far we can move our subject such that the spot never exceeds this size. This maximum diameter is called the circle of confusion c.
There is much debate on how the circle of confusion should be determined, which we will ignore for the moment. Just think of it as a small value such as 0.033 mm (one thirtieth of a mm, or 0.0013 inches).
9.2 Limits of acceptable sharpness
The range from gnear to gfar as shown in the figure above for which our blur spot does not exceed a given circle of confusion c is called the depth of field (DoF). It describes the distance of subjects which will be rendered with a minimum acceptable sharpness. gnear and gfar are known as near and far limit, respectively.
The depth of field equations can be derived as follows. By similar triangles along the green and yellow rays behind the lens, we get
| c / (hnear – h) | = | a / hnear | (D3a) |
| c / (h – hfar) | = | a / hfar | (D3b) |
Solving these equations for hnear and hfar respectively gives
| hnear | = | h a / (a – c) | (D4a) |
| hfar | = | h a / (a + c) | (D4b) |
Note that the aperture a of the lens is a distance which can be measured in mm, inches, or any other unit of length. With equation (A1), we can express a with the commonly used f-stop A as
| a | = | f / A | (D5) |
Substituting equation (D5) into equations (D4a) and (D4b) gives
| hnear | = | h f / (f – A c) | (D6a) |
| hfar | = | h f / (f + A c) | (D6b) |
We can now use the lens equations (D2a) and (D2b) to calculate the distances in front of the lens:
| 1 / f | = | 1 / gnear + (f – A c) / h f | (D7a) |
| 1 / f | = | 1 / gfar + (f + A c) / h f | (D7b) |
With the basic lens equation (D1), we can eliminate h and get a simpler form
| gnear | = | g f2 / (f2 + A c (g – f)) | (D8a) |
| gfar | = | g f2 / (f2 – A c (g – f)) | (D8b) |
Note that these equations measure the near and far limits from the lens. However, to keep the resulting figures consistent with the focus distance d, we have to measure these distances from the image plane. This can be achieved simply by adding h (not hnear or hfar). Thus, we define
| dnear | = | g f2 / (f2 + A c (g – f)) + h | (D9a) |
| dfar | = | g f2 / (f2 – A c (g – f)) + h | (D9b) |
These are the DOF equations used for the depth of field calculator.
9.3 Approximation
Equations (D9a) and (D9b) are not exactly intuitive on how the depth of field depends on its various parameters. To gain a better insight, we consider the range
| dof | = | dfar – dnear | (D10) |
from the closest to the most distant point of acceptable sharpness. With equations (D9a) and (D9b), we get the depth of field formula
| dof | = | 2 g f2 A c (g – f) / (f4 – (A c (g – f))2) | (D11) |
This doesn’t look any better yet. However, a number of approximations can be applied. If the subject is reasonably far away, i.e. the focal length f of the lens becomes insignificant compared to the focus distance d, both g and (g – f) can be approximated by d. Furthermore, if the focal length is not too small, the second term of the denominator can be neglected. Thus, we get the following approximation
| dof | ≈ | 2 d2 A c / f2 | (D12) |
9.4 Depth of field vs. focal length, distance and aperture
This is now much easier to understand. For a deep depth of field, e.g. in landscape photography,
- use a wide angle lens
- move away from your subject
- close the aperture (i.e. large f-number)
For a shallow depth of field, e.g. in portraiture,
- use a telephoto lens
- get close to your subject
- open the aperture (i.e. small f-number)
It’s interesting to note that the focus distance has a greater impact on the depth of field than the aperture. This is great news if you have a slow lens, but want to shoot a portrait with a nicely blurred background (bokeh): Just get as close to your subject as possible, and have the background at a distance. However, the size of the scene that you can cover this way may be very limited. For example, you may be able to capture the head, but not the shoulders or even the whole body [Wegner 2017, ch. 4.2].
9.5 Depth of field vs. magnification
As was stated above, a telephoto lens will give a shallower depth of field than a wide angle lens. But we should take a second look here. If you want to take a frame filling photo of someone or something, it’s always the same magnification, no matter what focal length you are using. You just have to move a little closer or farther away. So how does the magnification come in?
With the approximation of the magnification (M9)
| m | ≈ | f / d | (D13) |
which is also valid under the conditions mentioned above, approximation (D12) becomes
| dof | ≈ | 2 A c / m2 | (D14) |
In other words, the depth of field increases proportionally to the f-stop, but decreases quadratically with the magnification. This explains why you can easily capture a scene with a great depth of field in landscape photography, but get a very shallow depth of field in macro photography, which can only be overcome with techniques such as focus stacking.
Likewise, the smaller your image sensor, the smaller the magnification, and the deeper the depth of field. A tiny smartphone camera renders everything more or less in focus, while you can easily create sharp portraits with a lovely blurred background with a medium format sensor. Note however that applications of computational photography that estimate or measure the depth of a scene at every point such as Apple’s Depth Control are increasingly successful in bokeh simulation even with small sensors.
The depth of field also provides the basis to calculate the hyperfocal distance, which is often recommended for landscape photography.